FROM YOUR IPHONEThanks to Nick(Clownfish14)from MASVC for putting this one together.
Step 1.
Open the app store and go to the search tab. Type in "Photobucket" and hit search

Step 2.
Click the icon that is a camera in a blue square and says "Photobucket" next to it. once opened click the button that says "FREE" and then click install. You may have to enter your Apple ID password. If you don't know what this is read
THIS.

Step 3.
Once installed find the app on the home screen and open it by taping. it will take you to the main menu.

Step 4.
At the bottom of the screen you will see four selections. Click on the upload Media tab that looks like an up arrow. This will bring you to the login/create a new user screen. If you have already used this app and are signed in skip to step 6 if not keep reading. If you have an account on Photobucket.com then sign in with your username and password and skip to step 6. If not click the green button at the bottom that says "Join Now. It's Free!"

Step 5.
You now need to enter your account info. Make sure to enter a username and password you can remember! Once you are all done scroll to the bottom and hit submit.

Step 6.
You are now at the Upload Media page! On this page you have two options to upload your pictures. You can ether select the "Chose Existing" button if you have already taken the photo with your phone. Or you can hit the "Choose Camera" button if you wish to take the photo right now. In my opinion choosing the "Choose Camera" button is more difficult and i usually take my photos before launching the app.

Step 7.
Once you click the "Choose Existing" button you will be taken to your camera roll where you can select the pictures you want to use by clicking on them. After you have selected all the photos you want to upload hit the "Upload" button. this will take you back to the upload media tab where you will see your photos being uploaded. Make sure not to exit the app, change tabs, or lock your phone while they are uploading as it may cause an issue with the upload process.

Step 8.
After all the photos have uploaded and you are left with a blank uploading page click the "My Albums" button on the navigation bar at the bottom. This will take you to your album where you can see all the photos you just uploaded.

Step 9.
The next step is to tap on the first image you would like to add to the forum. This will enlarge the image. You can access your other images by hitting the button in the top left corner.

Step 10.
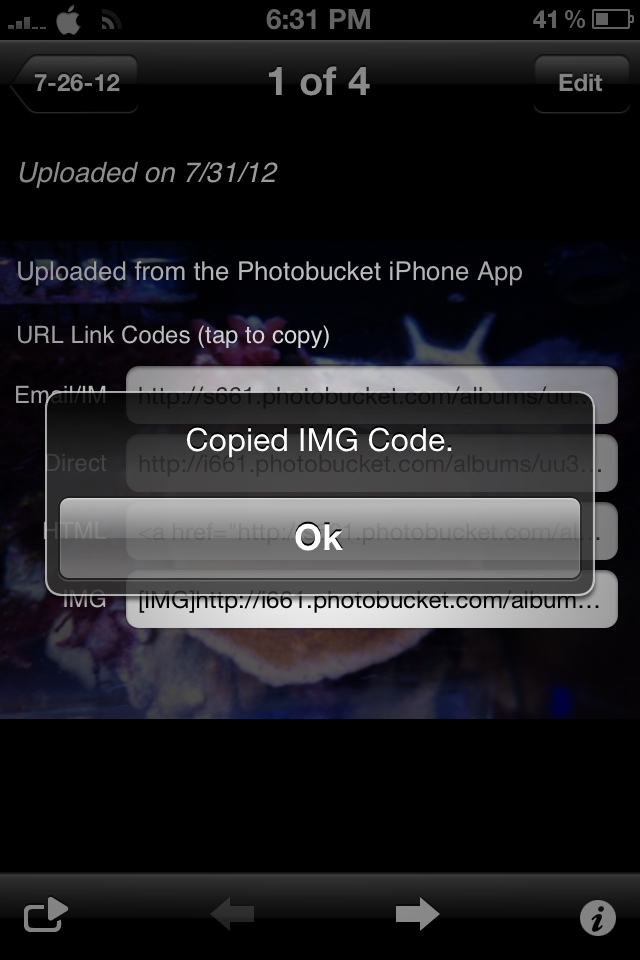
Now that you have completed step 9 click the button on the bottom right hand side of the screen that looks like an "i" inside a circle (the symbol for information). This will bring up the information screen where you have four different options.

Step 11.
For uploading to the MASVC forum you need to tap the white part of the IMG section at the bottom. A screen will pop up saying that you have copied the image code. Now you are halfway there!

Step 12.
Now hit your phones HOME button and launch your safari app. Type in "
www.masvc.org/" to the url bar and hit enter. this will take you to the MASVC website where you can browse the forums for the forum you want to post the picture.

Step 13.
After you find the forum you want to post the image in scroll to the bottom of the page where you will see the "Add Reply" button. tap that and it will take you to the screen where you can add your reply.

Step 14.
Tap the big white box where the text goes so that your keyboard pops up. Now hold down your finger in the white box until a button appears that says "Paste"

Step 15.
When you hit paste the IMG code that you copied in step 11 will appear. Hit the done button on your keyboard to hide it again. If you have more than one image to upload hit you home button again and open photobucket then follow steps 9-15 for each image you want to post.

Step 16.
After you have added every image you want to post scroll down to the bottom of the page where you will see the button that says "Submit" tap it.

Step 17.
After you tap the "Submit" button it will take you to your post that you just posted. You should see all the images that you posted.

Congratulations you just uploaded photos from the Photobucket app!
Now you can sit back and read all the comments people are making about your photo

If you have any questions please feel free to pm me!
